Tynker Toolbox: The Level Editor & Platformer Blocks
Have you ever played a Platformer game? It’s a game where the player has to jump around to advance, like Super Mario, Sonic the Hedgehog, Canabalt, or Geometry Dash.
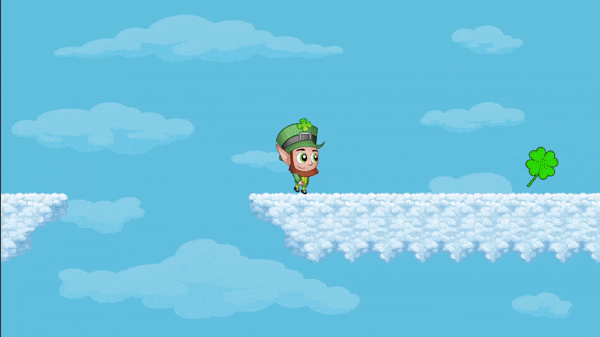
Here’s an example of a Platformer coded with Tynker, where you’re a leprechaun who can’t stop running, collecting shamrocks, and pots o’ gold. The game reports your final score when you fall.
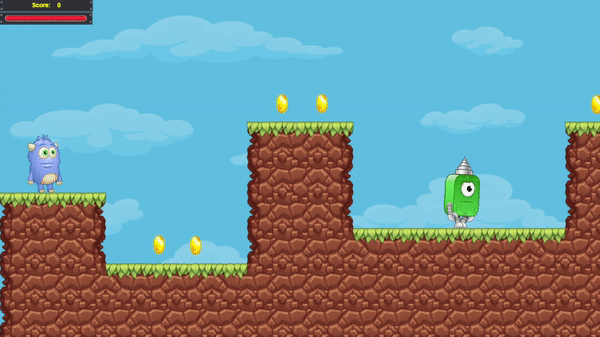
Here’s another platformer game, where you collect coins and defeat bad guys.
All new Retro art! Keep reading to see how you can use the cute new actors in the Fantasy theme.
Make Your Own!
Let’s see how to do it by yourself. You can design your own platformer game in Tynker, using two cool tools.
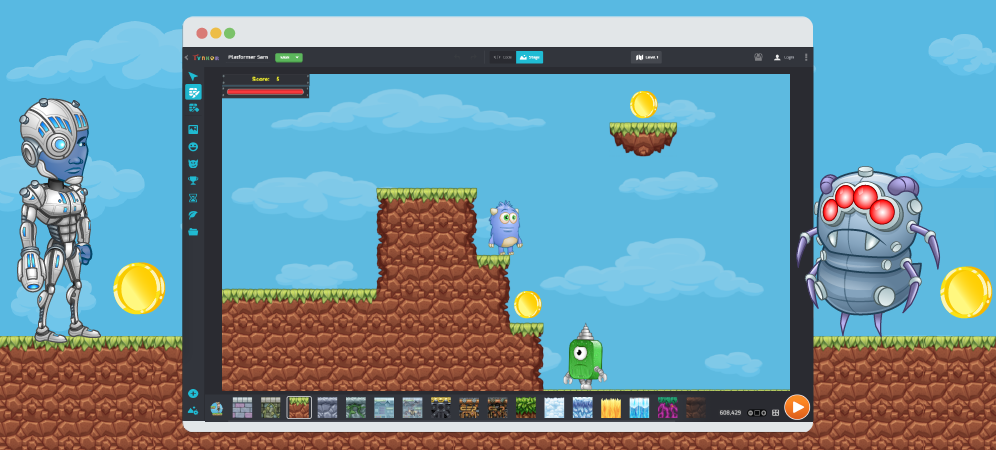
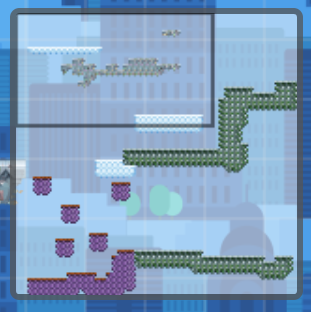
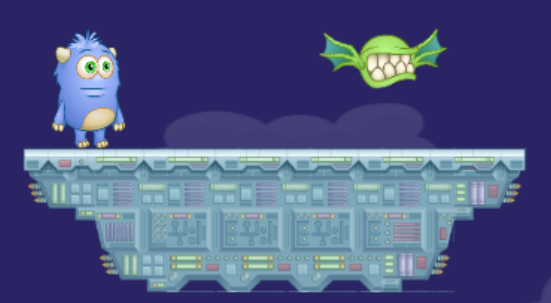
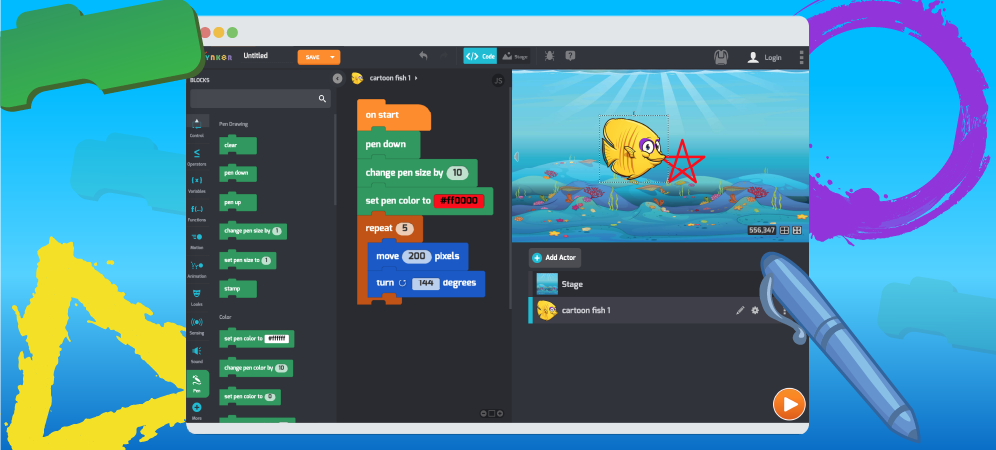
#1 The Level Editor lets you drag-and-drop game elements visually and create fun levels super fast. Here’s what it looks like:

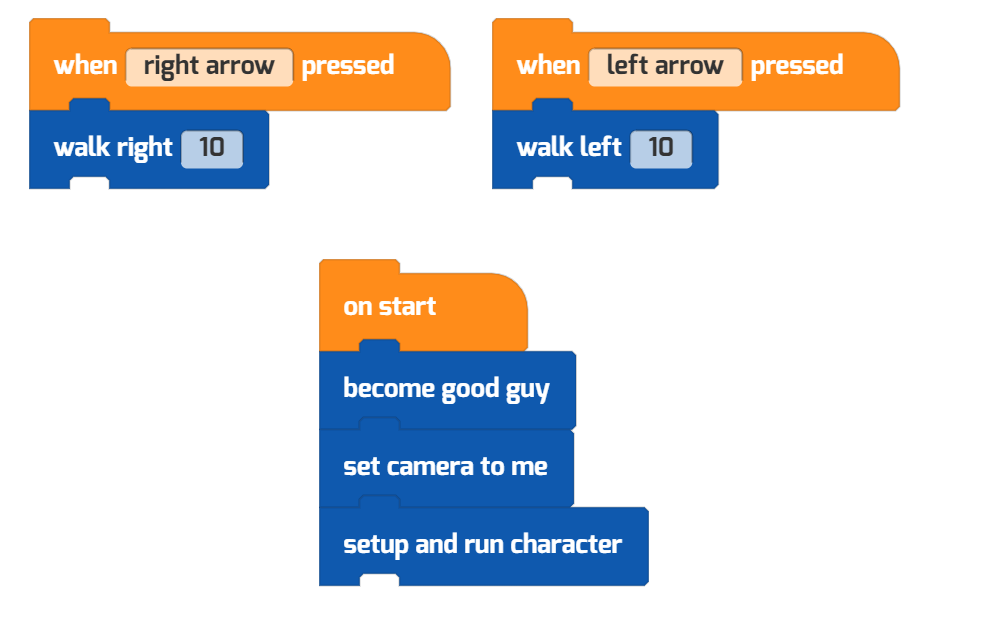
#2 The Platformer Blocks help you code platformer actors. For example, these three scripts are everything you need for a player-controlled character that can move left-and-right. Many of the props and characters in the video game Level Editor come with prebuilt code, which you can customize as needed to Level Editor the game.
What is a Level Editor in Games?
Alright, imagine you’re playing with building blocks to create your own fun world. A level editor in games is like a special tool that lets game creators or players build their own exciting game levels. With this tool, you can place characters, objects, and other things in the game world, just like you do with your building blocks. You get to decide how the game looks and how challenging it is. It’s like making your own special adventure for others to play and enjoy. And guess what? Some games even let you use the level editor to make your own unique levels and share them with your friends! It’s like being a game designer and letting your imagination run wild!
What are Platformer Blocks in the Level Editor?
Imagine you are playing a game where you control a cute character that can jump and run around. The game has different levels, and each level is like a different adventure. Now, a level editor is like a magic tool that lets you create your own levels for the game. You can use special blocks that act like floors and platforms where your character can walk and jump on. It’s like you’re the boss of the game world, and you get to decide how the levels look and where everything goes. You can make it easy or super tricky – it’s all up to you! It’s a bit like playing with building blocks, but instead of physical blocks, you use virtual ones to create your unique game adventures. You can share your awesome levels with your friends so they can play them too! How cool is that? With the video game level editor, you become a game designer and create fun challenges for everyone to enjoy!
Get Started with the Platformer Blocks
To follow along, login at tynker.com or start the App. Create a new project, then choose Platformer Project. An empty Tynker project will appear.
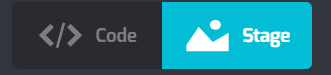
To access the Level Editor, which has drag-and-drop tools for placing game elements, click the Stage button at the top of Tynker Workshop:
After you click the Stage button, the Level Editor will appear.
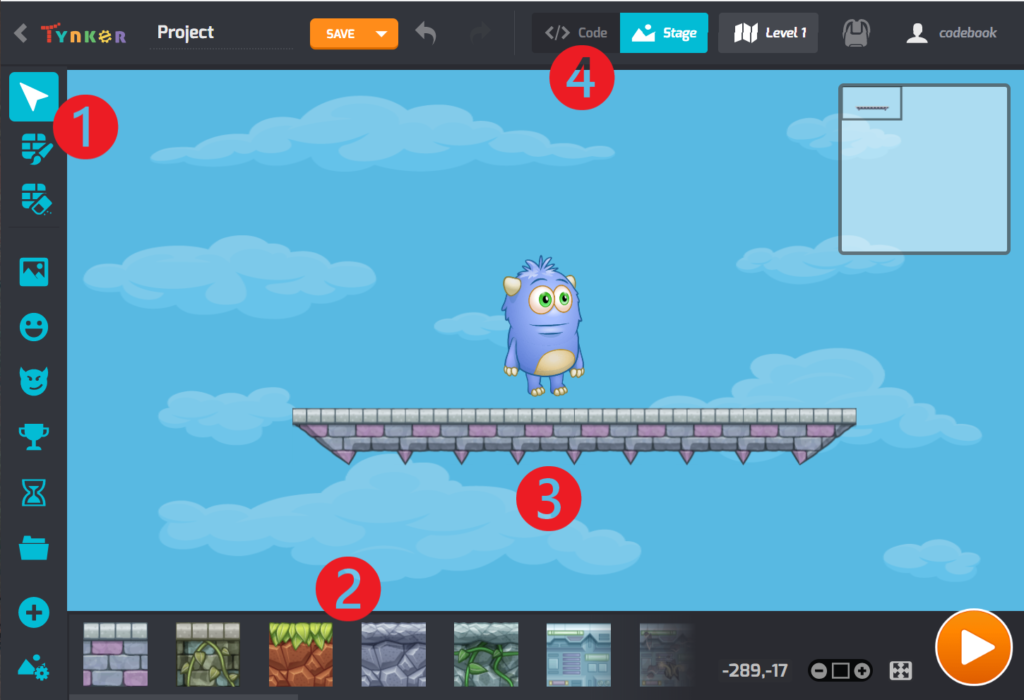
❶ Choose a Tool from these choices on the left.
❷ Then see your tool’s Options below. For example, all the possible Tiles are shown at bottom currently.
❸ Draw your level here. Draw tiles, place actors, and more.
❹ Return to the Code View by clicking here—you’ll exit the Level Editor View.
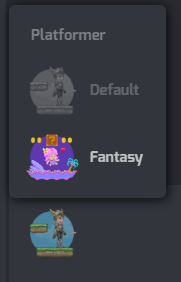
Swap Themes
If you like this retro art style, change the theme to Fantasy and you’ll see new Heroes and Awards in a cool new style to match.
Like the classic look instead? You can stick with Default.
Move, Paint, and Delete Tiles
The Tile tools help you draw platforms your characters can stand on—and walls your actors can’t walk through. You have three tools at the top to help with Tiles. Let’s look at each one.

Move. ↖ Click and drag to reposition the screen, so you can build your level in whatever direction you wish. This tool also lets you move, scale, and rotate actors and collectibles.
- move ✥
- scale ▫️◻️ ⬜ and
- rotate 🔄
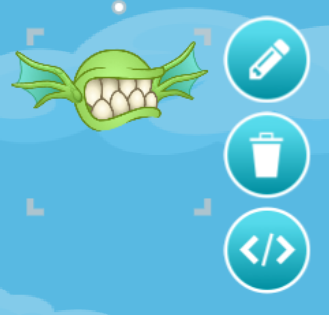
When you click on an actor with this tool in the Level Editor, new buttons appear. Using them, you can Change Costumes, Delete the Actor, or See Actor’s Code.
The handles on the corners let you change the actor’s size. The handle on top lets you rotate an actor (some actors can’t rotate freely, but can only face left or right).
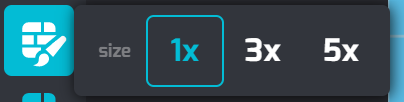
Paint. 🖌️ This tool draws copies of whatever tile you’ve selected.
You can paint with Tiles one at a time (1x)—or choose 3x or 5x to place them in bigger sections. Choose the tile to paint with from the options at bottom—you can also scroll to the right to see more options.

Erase. This will remove tiles from your project.
BTW. Yes, there IS a minimap! When you move around your level (for example, using the Move tool or scrolling with the mouse), you’ll see a minimap appear on the right, which gives you a view of your complete level. The bounding box shows what’s currently on screen, but the map displays your complete level as a thumbnail image.
Level Editor Tools
Here’s a detailed look at the other Tools you can use in the Level Editor, which can let you create a working game prototype quickly.

Backgrounds. This artwork doesn’t affect how your level plays—like the name suggests, it’s only shown in the background. Click one and swap it out.

Heroes are playable, rigged characters you can control. They’re also called Good Guys. You usually only want one Hero for each level of your platformer. Heroes come with default movement controls, which you can customize on your own.

Villains are the Bad Guys. They’ll interact with the Good Guys—Bad Guys attack Good Guys when they appear on stage together. Bad Guys can be defeated by the Good Guys’ attack moves. Look inside their code to change their attacks, Health, and more.

Awards are Collectible items you can place on your level, which can be picked up by Heroes. The prebuilt collectibles are: Heart (adds Health), Coin (adds Points), and Star (gives Invincibility).

Interface elements are progress bars and scoreboards for the player’s Health and Points. Look inside the Actor’s code to customize them and keep track of your own custom variables on-screen!

Propsare background actors that aren’t collectible by default. You’ll need to add their code yourself! Look at Awards to get an idea of how they might be turned into collectibles.

The Media Library lets you add other game elements, props, and actors. Just be warned, you’ll need to code these actors yourself—just like props, they won’t come with prebuilt code like the other Platformer elements.
Play Your Hero
If you haven’t already, place a single Hero in your level from the Level Editor view.
Pick a Hero and place them somewhere on your level—pick a flat place where they can walk around. Add some tiles under their feet if you need to.
Switch back to the Code View of Tynker. Look at your Hero’s code to get a sense of the controls you can use:
Try playing the project (press Play) and practice with some of the moves you saw in the code:
- Press up-arrow to jump. You can double-jump!
- Press s to shoot — this is your ranged attack.
- Press a to slash — this is a close-quarters attack.
- Press down-arrow while jumping to slam attack.
Add Enemies
Stop your project and switch back into the Level Editor view. Choose the Villains, then drag one into your project. Then press Play again and see if you can defeat it. Make sure to check out the enemy’s code in Code View.
Add Levels

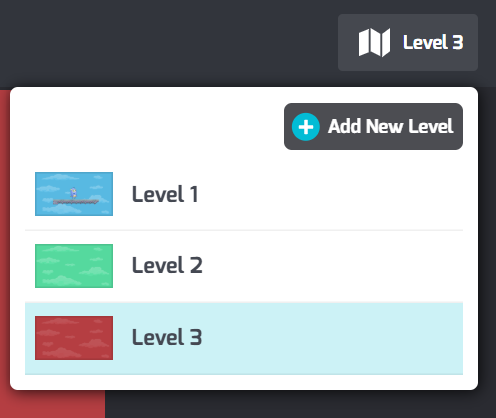
Do you want to add more than one level to your game? You can modify your games with Level Editor, here’s how. Click on the “folded map” icon near the top of the Level Editor. It will have your current level’s name.
Click (+) Add New Level to add new levels. You can rename your levels here, too!
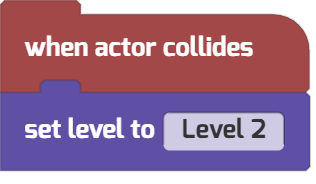
Here’s a very simple script for a collectible powerup that advances the player to Level 2.
BTW: By default, new levels will start blank. That means you’ll need a hero, background, tiles, actors, and anything else you’d like to add! This also means that each new level can have totally different controls and characters!
You Can Change The World Size!
To start, the Platformer World is 50 x 50 tiles wide. Want to make something bigger? Or wider? Or taller? Or tiny?

Tweak the size by editing the Stage’s World property. Click on the icon that looks like a background with a gear.
Then change the World Size attributes height and width.
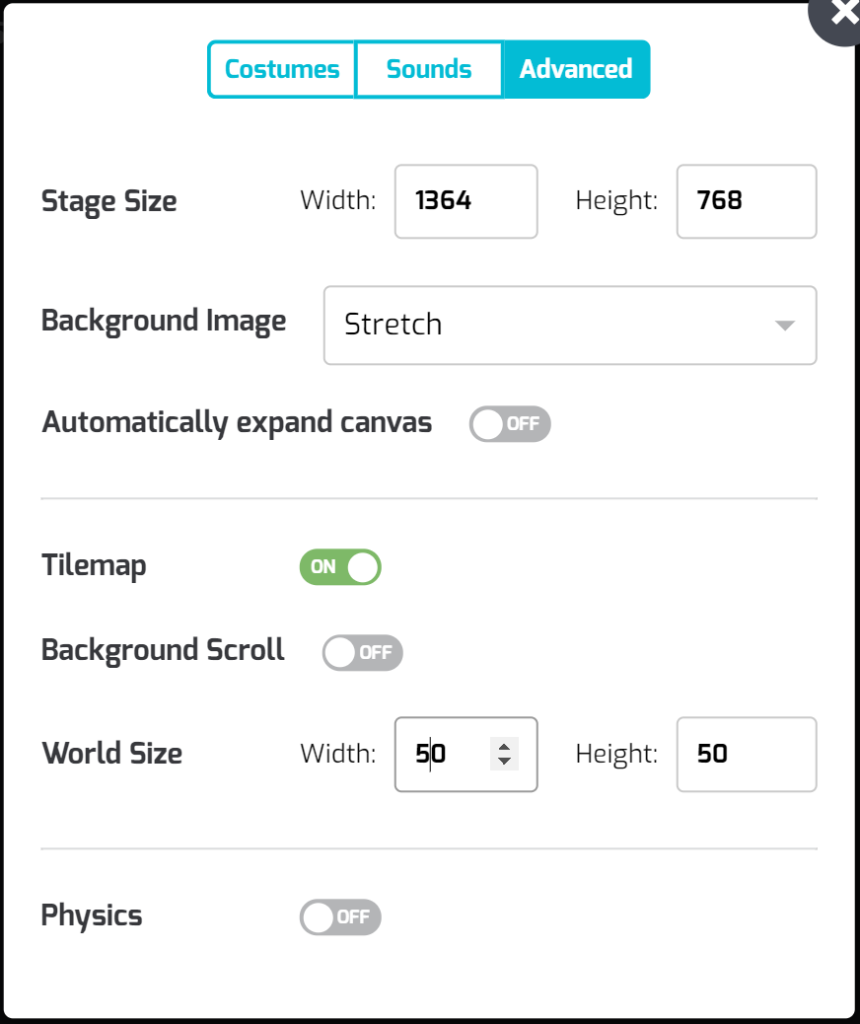
You can change World Size depending on the style of game you want to create. Does your game scroll to the side, left-to-right? Try making it 25 x 100 tiles.
Or is it a game where the player has to climb—like mountaineering or scaling the ramparts of a castle tower? Or is your hero going down, venturing into the depths of an abandoned mine!? Make it tall and skinny, like 100 x 25 tiles!
Change the World Size so it suits your vision of the game. You can also fine-tune your player’s Stage Size and how the Background image is formatted.
What Do You Want to Create?
Now that you’ve played around a little bit with the Level Editor, think harder about what kind of games you want to create.
Is it an action game, where the player is always blasting baddies and picking up new weapons? Or something in an adventure game style, where the player discovers a story by picking up items, solving puzzles, and listening to characters talk? Or is it all about challenging jumps and avoiding tricky traps, a true platformer? A little bit of everything? Or something else entirely?!
It’s all up to your imagination. Make something cool? Share your platformer with us at community@tynker.com
More Activities?
Looking for more coding activities? Check out the Course Catalog.
And read more of our Tynker Toolbox articles, too!
- Tynker Workshop Basics — Start coding with Tynker and learn about coordinates.
- The Animation Tool — Learn about frame-based animation and other animation tips.
- The Character Creator — Take control of custom rigs using the Animation blocks.
- The Physics Blocks — Create games or simulations with gravity, collisions, and more. Think: Angry Birds and Marble Madness.
- The Pen Blocks — Make your actors draw as they move. Create patterns, draw geometric shapes, and more.
- The Sound Blocks — Play music with code! Add custom sound effects, too. Tynker’s brand new music tool supports MIDI and MP3.
- Code Block Tricks — Get top-secret ninja tips for writing code fast in Tynker Workshop.
- The Debugger — Learn about Tynker’s data debugger and get bug-fixing tips.
